Learning Examples | Foundations | Hacking | Links
Examples > Communication
Virtual Color Mixer
This example demonstrates how to send multiple values from the Arduino board to the computer. The readings from three potentiometers are used to set the red, green, and blue components of the background color of a Processing sketch or Max/MSP patch.
Hardware Required
- Arduino Board
- (3) Analog Sensors (potentiometer, photocell, FSR, etc.)
- (3) 10K ohm resistors
- breadboard
- hook-up wire
Software Required
Circuit
Connect analog sensors to analog input pins 0, 1, and 2.
This circuit uses three voltage divider sub-circuits to generate analog voltages from the force-sensing resistors. a voltage divider has two resistors in series, dividing the voltage proportionally to their values.
Click on the image to enlarge

image developed using Fritzing. For more circuit examples, see the Fritzing project page
Schematic
Click on the image to enlarge

Code
The sensor values are sent from the Arduino to the computer as ASCII-encoded decimal numbers. This means that each number is sent using the ASCII characters "0" through "9". For the value "234" for example, three bytes are sent: ASCII "2" (binary value 50), ASCII "3" (binary value 51), and ASCII "4" (binary value 52).
This example reads three analog sensors (potentiometers are easiest)
and sends their values serially. The Processing and Max/MSP programs at the bottom
take those three values and use them to change the background color of the screen.
The circuit:
* potentiometers attached to analog inputs 0, 1, and 2
http://arduino.cc/en/Tutorial/VirtualColorMixer
created 2 Dec 2006
by David A. Mellis
modified 30 Aug 2011
by Tom Igoe and Scott Fitzgerald
This example code is in the public domain.
*/
const int redPin = A0; // sensor to control red color
const int greenPin = A1; // sensor to control green color
const int bluePin = A2; // sensor to control blue color
void setup()
{
Serial.begin(9600);
}
void loop()
{
Serial.print(analogRead(redPin));
Serial.print(",");
Serial.print(analogRead(greenPin));
Serial.print(",");
Serial.println(analogRead(bluePin));
}
/* Processing code for this example
// This example code is in the public domain.
import processing.serial.*;
float redValue = 0; // red value
float greenValue = 0; // green value
float blueValue = 0; // blue value
Serial myPort;
void setup() {
size(200, 200);
// List all the available serial ports
println(Serial.list());
// I know that the first port in the serial list on my mac
// is always my Arduino, so I open Serial.list()[0].
// Open whatever port is the one you're using.
myPort = new Serial(this, Serial.list()[0], 9600);
// don't generate a serialEvent() unless you get a newline character:
myPort.bufferUntil('\n');
}
void draw() {
// set the background color with the color values:
background(redValue, greenValue, blueValue);
}
void serialEvent(Serial myPort) {
// get the ASCII string:
String inString = myPort.readStringUntil('\n');
if (inString != null) {
// trim off any whitespace:
inString = trim(inString);
// split the string on the commas and convert the
// resulting substrings into an integer array:
float[] colors = float(split(inString, ","));
// if the array has at least three elements, you know
// you got the whole thing. Put the numbers in the
// color variables:
if (colors.length >=3) {
// map them to the range 0-255:
redValue = map(colors[0], 0, 1023, 0, 255);
greenValue = map(colors[1], 0, 1023, 0, 255);
blueValue = map(colors[2], 0, 1023, 0, 255);
}
}
}
*/
/* Max/MSP patch for this example
----------begin_max5_patcher----------
1512.3oc4Z00aaaCE8YmeED9ktB35xOjrj1aAsXX4g8xZQeYoXfVh1gqRjdT
TsIsn+2K+PJUovVVJ1VMdCAvxThV7bO7b48dIyWtXxzkxaYkSA+J3u.Sl7kK
lLwcK6MlT2dxzB5so4zRW2lJXeRt7elNy+HM6Vs61uDDzbOYkNmo02sg4euS
4BSede8S2P0o2vEq+aEKU66PPP7b3LPHDauPvyCmAvv4v6+M7L2XXF2WfCaF
lURgVPKbCxzKUbZdySDUEbgABN.ia08R9mccGYGn66qGutNir27qWbg8iY+7
HDRx.Hjf+OPHCQgPdpQHoxhBlwB+QF4cbkthlCRk4REnfeKScs3ZwaugWBbj
.PS+.qDPAkZkgPlY5oPS4By2A5aTLFv9pounjsgpnZVF3x27pqtBrRpJnZaa
C3WxTkfUJYA.BzR.BhIy.ehquw7dSoJCsrlATLckR.nhLPNWvVwL+Vp1LHL.
SjMG.tRaG7OxT5R2c8Hx9B8.wLCxVaGI6qnpj45Ug84kL+6YIM8CqUxJyycF
7bqsBRULGvwfWyRMyovElat7NvqoejaLm4f+fkmyKuVTHy3q3ldhB.WtQY6Z
x0BSOeSpTqA+FW+Yy3SyybH3sFy8p0RVCmaMpTyX6HdDZ2JsPbfSogbBMueH
JLd6RMBdfRMzPjZvimuWIK2XgFA.ZmtfKoh0Sm88qc6OF4bDQ3P6kEtF6xej
.OkjD4H5OllyS+.3FlhY0so4xRlWqyrXErQpt+2rsnXgQNZHZgmMVzEofW7T
S4zORQtgIdDbRHrObRzSMNofUVZVcbKbhQZrSOo934TqRHIN2ncr7BF8TKR1
tHDqL.PejLRRPKMR.pKFAkbtDa+UOvsYsIFH0DYsTCjqZ66T1CmGeDILLpSm
myk0SdkOKh5LUr4GbWwRYdW7fm.BvDmzHnSdH3biGpSbxxDNJoGDAD1ChH7L
I0DaloOTBLvkO7zPs5HJnKNoGAXbol5eytUhfyiSfnjE1uAq+Fp0a+wygGwR
q3ZI8.psJpkpJnyPzwmXBj7Sh.+bNvVZxlcKAm0OYHIxcIjzEKdRChgO5UMf
LkMPNN0MfiS7Ev6TYQct.F5IWcCZ4504rGsiVswGWWSYyma01QcZgmL+f+sf
oU18Hn6o6dXkMkFF14TL9rIAWE+6wvGV.p.TPqz3HK5L+VxYxl4UmBKEjr.B
6zinuKI3C+D2Y7azIM6N7QL6t+jQyZxymK1ToAKqVsxjlGyjz2c1kTK3180h
kJEYkacWpv6lyp2VJTjWK47wHA6fyBOWxH9pUf6jUtZkLpNKW.9EeUBH3ymY
XSQlaqGrkQMGzp20adYSmIOGjIABo1xZyAWJtCX9tg6+HMuhMCPyx76ao+Us
UxmzUE79H8d2ZB1m1ztbnOa1mGeAq0awyK8a9UqBUc6pZolpzurTK232e5gp
aInVw8QIIcpaiNSJfY4Z+92Cs+Mc+mgg2cEsvGlLY6V+1kMuioxnB5VM+fsY
9vSu4WI1PMBGXye6KXvNuzmZTh7U9h5j6vvASdngPdgOFxycNL6ia1axUMmT
JIzebXcQCn3SKMf+4QCMmOZung+6xBCPLfwO8ngcEI52YJ1y7mx3CN9xKUYU
bg7Y1yXjlKW6SrZnguQdsSfOSSDItqv2jwJFjavc1vO7OigyBr2+gDYorRk1
HXZpVFfu2FxXkZtfp4RQqNkX5y2sya3YYL2iavWAOaizH+pw.Ibg8f1I9h3Z
2B79sNeOHvBOtfEalWsvyu0KMf015.AaROvZ7vv5AhnndfHLbTgjcCK1KlHv
gOk5B26OqrXjcJ005.QqCHn8fVTxnxfj93SfQiJlv8YV0VT9fVUwOOhSV3uD
eeqCUClbBPa.j3vWDoMZssNTzRNEnE6gYPXazZaMF921syaLWyAeBXvCESA8
ASi6Zyw8.RQi65J8ZsNx3ho93OhGWENtWpowepae4YhCFeLErOLENtXJrOSc
iadi39rf4hwc8xdhHz3gn3dBI7iDRlFe8huAfIZhq
-----------end_max5_patcher-----------
*/
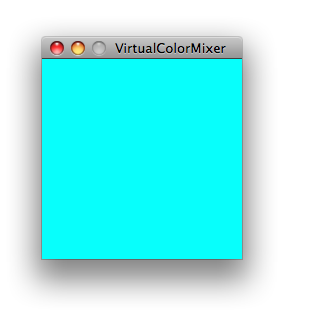
Processing Code
Copy the Processing sketch from the code sample above. As you change the value of the analog sensors, the background color will change:
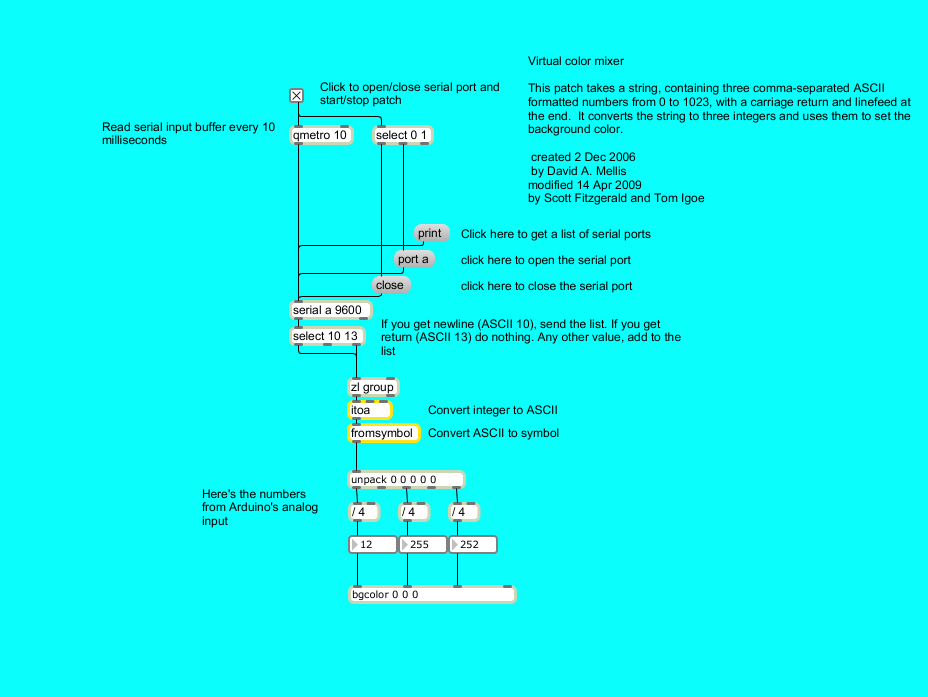
Max Code
The max patch looks like this. Copy the text of it from the code sample above and paste into a new Max window.
See Also:
serial.begin()serial.print()analogRead()- Dimmer - move the mouse to change the brightness of an LED.
- Graph - send data to the computer and graph it in Processing
- Physical Pixel - turn an LED on and off by sending data from Processing.
- Serial Call Response - send multiple variables using a call and response (handshaking) method.
- Serial Call and Response ASCII - send multiple vairables using a call-and-response (handshaking) method, and ASCII-encoding the values before sending.
- Serial Input (Switch (case) Statement) - How to take different actions based 0n characters received by the serial port.