Learning Examples | Foundations | Hacking | Links
Examples > Communication
Serial Call and Response (handshaking) with ASCII-encoded output
This example demonstrates string-based communication from the Arduino board to the computer using a call-and-response (handshaking) method.
The sketch sends an ASCII string on startup and repeats that until it gets a serial response from the computer. Then it sends three sensor values as ASCII-encoded numbers, separated by commas and terminated by a linefeed and carriage return, and waits for another response from the computer.
You can use the Arduino serial monitor to view the sent data, or it can be read by Processing (see code below), Flash, PD, Max/MSP (see example below), etc. The examples below split the incoming string on the commas and convert the string into numbers again.
Compare this to the Serial call and response example. They are similar, in that both use a handshaking method, but this one encodes the sensor readings as strings, while the other sends them as binary values. While sending as ASCII-encoded strings takes more bytes, it means you can easily send values larger than 255 for each sensor reading. It's also easier to read in a serial terminal program.
Hardware Required
- Arduino Board
- (2) analog sensors (potentiometer, photocell, FSR, etc.)
- (1) momentary switch/button
- (3) 10K ohm resistors
- breadboard
- hook-up wire
Software Required
Circuit
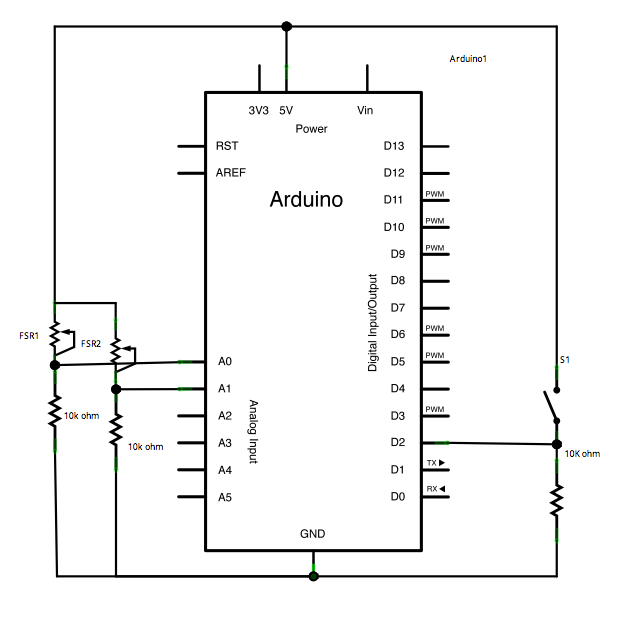
Connect analog sensors to analog input pin 0 and 1 with 10Kohm resistors used as voltage dividers. Connect a pushbutton or switch connected to digital I/O pin 2 with a 10Kohm resistor as a reference to ground.
click the image to enlarge
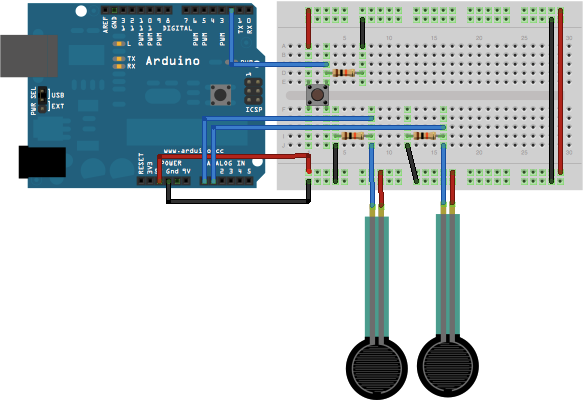
image developed using Fritzing. For more circuit examples, see the Fritzing project page
Schematic
click the image to enlarge
Code
Serial Call and Response in ASCII
Language: Wiring/Arduino
This program sends an ASCII A (byte of value 65) on startup
and repeats that until it gets some data in.
Then it waits for a byte in the serial port, and
sends three ASCII-encoded, comma-separated sensor values,
truncated by a linefeed and carriage return,
whenever it gets a byte in.
Thanks to Greg Shakar and Scott Fitzgerald for the improvements
The circuit:
* potentiometers attached to analog inputs 0 and 1
* pushbutton attached to digital I/O 2
Created 26 Sept. 2005
by Tom Igoe
modified 26 Oct 2011
by Tom Igoe and Scott Fitzgerald
This example code is in the public domain.
http://arduino.cc/en/Tutorial/SerialCallResponseASCII
*/
int firstSensor = 0; // first analog sensor
int secondSensor = 0; // second analog sensor
int thirdSensor = 0; // digital sensor
int inByte = 0; // incoming serial byte
void setup()
{
// start serial port at 9600 bps:
Serial.begin(9600);
pinMode(2, INPUT); // digital sensor is on digital pin 2
establishContact(); // send a byte to establish contact until receiver responds
}
void loop()
{
// if we get a valid byte, read analog ins:
if (Serial.available() > 0) {
// get incoming byte:
inByte = Serial.read();
// read first analog input:
firstSensor = analogRead(A0);
// read second analog input:
secondSensor = analogRead(A1);
// read switch, map it to 0 or 255L
thirdSensor = map(digitalRead(2), 0, 1, 0, 255);
// send sensor values:
Serial.print(firstSensor);
Serial.print(",");
Serial.print(secondSensor);
Serial.print(",");
Serial.println(thirdSensor);
}
}
void establishContact() {
while (Serial.available() <= 0) {
Serial.println("0,0,0"); // send an initial string
delay(300);
}
}
/*
Processing code to run with this example:
// This example code is in the public domain.
import processing.serial.*; // import the Processing serial library
Serial myPort; // The serial port
float bgcolor; // Background color
float fgcolor; // Fill color
float xpos, ypos; // Starting position of the ball
void setup() {
size(640,480);
// List all the available serial ports
println(Serial.list());
// I know that the first port in the serial list on my mac
// is always my Arduino module, so I open Serial.list()[0].
// Change the 0 to the appropriate number of the serial port
// that your microcontroller is attached to.
myPort = new Serial(this, Serial.list()[0], 9600);
// read bytes into a buffer until you get a linefeed (ASCII 10):
myPort.bufferUntil('\n');
// draw with smooth edges:
smooth();
}
void draw() {
background(bgcolor);
fill(fgcolor);
// Draw the shape
ellipse(xpos, ypos, 20, 20);
}
// serialEvent method is run automatically by the Processing applet
// whenever the buffer reaches the byte value set in the bufferUntil()
// method in the setup():
void serialEvent(Serial myPort) {
// read the serial buffer:
String myString = myPort.readStringUntil('\n');
// if you got any bytes other than the linefeed:
myString = trim(myString);
// split the string at the commas
// and convert the sections into integers:
int sensors[] = int(split(myString, ','));
// print out the values you got:
for (int sensorNum = 0; sensorNum < sensors.length; sensorNum++) {
print("Sensor " + sensorNum + ": " + sensors[sensorNum] + "\t");
}
// add a linefeed after all the sensor values are printed:
println();
if (sensors.length > 1) {
xpos = map(sensors[0], 0,1023,0,width);
ypos = map(sensors[1], 0,1023,0,height);
fgcolor = sensors[2];
}
// send a byte to ask for more data:
myPort.write("A");
}
*/
/*
Max/MSP version 5 patch to run with this example:
----------begin_max5_patcher----------
3365.3oc4bk0iiaiD9Y2+J3JLOrAq6Fhj5LOscRP.lGxtCxDr6CYBFHaQaqL
xRNRzcOcBx+8s3grkZac31Vr8jMASKScPU7qNXUTUw+3lIVyx+LqzB80neFM
YxebyjIxSINwDc6IVqi977znR4sYMOe8ZVF2Zp5Zb1m4pyuJOujghPkrhjnT
zl7BNZQQ9ZDeURIBdlsUOyh7LdYxuyDOGlbms9zYaWmjkx3x2Cd+Iy2xqNa0
stIhOeUR1xOVvlyUTuuqOzSHRfs7fspEz.8K5GJIVRn4y90ao90okrn0RZw5
dAkaItvedyMh+LcffRF6QnaO.SzPQnmsM5eFskmmugkgrOebfzNNPbbDibJU
hCXG2tvArSEsn5b9SaXptwJQviQVV6drKCRslUVFsjcn3SJH8bJ.C4n.Ctcf
gRjhDTaO4gPI7DbbbgfaEWtz.RKhNR7XVT1xSASrOYLITJrfUG75VVwqULQR
mlAWRyihOUXAepvhiGsNrX2ErPbtFfkMELvzRrzp6nBM9Dk5CUJq3G1IzDXL
snsuz4WR3r054+rduzb86jPHxZp3OyxyWK92seS5VFX+lu5128c2e6s3c2w9
K7C4wr0G47hG38OkMe2k99jB12m9zsgem+2b66e261CFMYCz1YCdJ7WaLiX2
oHJE2qU9FV5EWWiIlU5MZi3vnJ+pANhxagvfNwMxq8r.bz7TVTw3pQqkgHRa
dNzNQDZqHhhPMCr.JsEFQJQgIjt8kz40VJo.dwrKjoeRufBNTZrwizInztyB
igWks.LhvOJeBLfmd4jVlmmlWnFJXABXeWPnMNzS7Ka8uv0.ki4htxQK2.0b
nNcAj9u1BWI77nSA8nlB8TBfNdcgdAcNwmY.veOEsDzP2b9A2P5GTTg031oQ
bmqAUyRVJP7HrMBSOekyN7ThXqfDao7le2g3X2su7S2ezTwE64NtAE6Js93D
HQGJ4N21CJN701TDHyfvipZTEb3JssP6z1hWuxJWZXoskdSE2B5aiRSu8GYk
axyJYn6e+2912h9P1GxdO3ScIJBM6IvKAfXQ7Ur5qR2TTD36cAKBtKp94XYP
vLwSQhWoXI81DUDwYwHTR1TDuXa1bYyYOA8aZRFaAiEeG5sx9NCtedIZQdAa
Y9VnqkF8mh97l7R065I3Wn7EvyNOo.bbDssD3CR55gHHtoRfZ3aKxf2fdEDa
Pv2gjiq+UNm80neRr5hRVIBvIHNvR31iTCxX1CIygwblrEDKFq.Ihy.d0OqK
QPmrLWRD4v4EwhfDzDPaJXaghxPdtn+tBht+qDcbIOpfucyc.c.c3mXB53wn
D03WQIhNXZEvHYEYZT9dzivYYO.jUBGdLPhFsFfMTbDO5N4fbNvWDHM1Ac+l
BQjdgeHCf82OOmyQeeB+2WxJhRik35OAX0aWly9P11MwxGihQ+6477YLwih2
o7HXYyAdiT9ASGy0k0QY3UpP45nVTx.uiqR4ZYD8EdQxR.0P+cfC8y7e4qDr
p4Bgtjkq32lxV.gckm8.7nIfpDHsceZpRdpH5QgLh.q2TjCOiTt8wD35qjAu
hlwDx8neH5yfL7uAhx.KELmokquC8eEhAxUDuhJVjTv.8BP.3.oCPVLp7Sn6
Kh2ljkKknp0WGkYNp7Rhx7nGQNKpi9PKSW3YHtYAKIKgCcJLZKkrokfneoT0
Bosh.JpQR89EGEzHiIngUt4SUGv5EtwoEPywLf17Ur4epxFECjxlmjnsvAl5
.gLA9Hj+lwVljImFXaVBXzGzHDJDK3BaVJbu4UEVRWGEKs3A+bVZ97OgJWsE
zChyeL6UPp0wWEo.VYHpximVX.Ti7kg1f9fkvZhD8USB9Aqi5Zi8KILqio6R
knfudQ98Te+ivVPgSdku9Orh3nrcQJJI.VgFXzHC7HIohY6JA4jZj6DKv1Ys
SOo1iHfyeUExn6zcmBrFVTuCl.VAdHo54CUmDXR2TcwJTPw70qquZ1HmfZN3
ArykBIVVbMgpIVwrEmReH9Le6ueaUft09Sy6LIaCLC.nkJ0ed96MZaJ+iGWh
n40WDMm05C2BeZh0xhj37LAYz3YEmt5EJr6qzbpS4x6HKZyQdXddd5rnBACY
VJqAiFTVhxRVCFn4IJJB7no5hIq2TjnLHr6brrHnOVUNuHOMsQWotxCG4JJ2
9dLIluR1W6wqFes65RY0Uiab9NCS64q1zxY.H4V8u52TCFH9N2PWbfesqerv
VZW+t0vWTg2hcs2u310il6fUBvuNM1tpdW1CmTYSTqxMV.qs3+MOjRzPpREv
MrWH06pARaL0ygQRKjRaGP2M4aqS.29xvzp3o5yTgUG7TQWi6.Kc6DKacIYZ
e1Iyftah.Wdr6QhsC.14kJrpz60xpXclvzE.SeoBqlEP+GH7KBHe4Z8MjTc5
GHIcBj0Wr4+uCK0FPGLThutfxtlXR9MOmh1DATUND8D5MXzaHn2PQuww7SUo
09qNP5cpJ6qlopjidq1PD6WLh3KVOasL2g9v97UeJ3zj7phsV77eA.FXRcMv
9Qiv+RiFT6SBM7ruNPC0a15zcMytmI7HA2Qg+ywYp72CCTZXptug79PGEK8S
KQgIIMw0ONVTlusXdEnWEACpIAFyJ4IY6hk9m2SqO6FWkDG2LxU0ZKDuIG3m
6R.pAw8NY516KT519KS51anzsHliqH5VXEdXzM4KT5FBAAgudn6fgR2WWx2C
mtoWW1SHmBcSudna7oP2jqG518.0sVna+qK4D2gh2dWWzMcnzs8Ejt0mr5Cf
XUF8.K9ivqA726iQbdQxrsbkKXM95LG6qHLde5gNuXee4iko4yhR0eloc8h0
M6QhKyGpydjqII0WCNjtO8qZKeib8uBRlw+1sWhLvpqRuQGWlKd.Hh6U.hHR
1.vhpQPEpusJMZ5JuzbMW9nyyWtLcWNKdl0bklwS1UJKcLDo8v3u3r2w0LfN
GUcFD609pHMLsG07vrRdOb.0jhSfwSDyz4wmfPuSuIkQ.VuVKd6Nbzhpn8Lv
MMoTVHWUG2W8tWxhQxyEkNtEurRQvinxQGxy+XAMPC2WXsKW+iDbgRmpGhRo
iZ0s6pRoees+B9cALXqK7nFnxYWhBtpKE9.RswmqWmL9936cT2siCumLp7dc
dVNLdefk4F13QcXSB8G7vlX+EnLO00evx7DxqiPuAfgpDSTCCtcBCuR59sLi
31r5o5wkXi8vsWbxSU9k5D3rUfJrOfp0ClB7zU.lMBOp0+kda+fnbwpmpV80
q9uZMQsSS.IrUrBY1XK2UPddsqLpVg0oT3tMZfNKIJhm0q.nH2TcLIlniNY2
VMT2XxEdqFpsBETlEti5ZU4DVaTqlOtsREDatZErMYjusgLxRFWVoZkbQ8MT
SPobbkTv57KXHaJUDqq1EmQuoRgUKPAgT82ix6wFawY9s0LdQ9EYwH5evWMC
R2UPLwn6FPsYLPkG8ip0.s+GpEqRUorsZMf9paM3GYQwUp8IYa1xQy1tXgnb
PefU7jnLzWmjBlGXyyyhKMeQhoS4FsABkUi1pQLrgJrNkETQ8vJpw0wMVOer
x9RP+6pT3K7Dphw6rsbd9toOWkTkFS0dQUeiK7wvA5NbXVdQrptm1clkGtoW
3GDPnthe43a6FD7rM8hZkCzgEmNVAOOuVhNNGXGybmcoYPDKh8ihr39cmV7z
4fBRsAf8cjo09Se6UG9pMRMW+9WTeha26KES6+q5T0oKyxAZPH9VeLpXMMFK
MJLq5iEI.oJBLu8Ufm.OZ77fOQ1Rn34+P1W+kPXrawJ7qhXkOUMireP+hUgz
+BKVI63l4SoRJ644ofVV6f7SPrNA6SOkVxMARijz4v7R334jvAR9mDM4zCMQ
MJIQaj1LsASglGlr6ilLKN4ZO.ZBaaTZxe.jD08zHIhuiHwD7v5HCB105LI1
fAPr9FE9bF.EEXTJBODgLmSjgpXgtjPYBmnXuxVWBhkbgIVM4o+9n0ZctDKd
Hpulc1.5P31Dr4oo9lN.a1oCFDuidhldItTUBXo2ze8105bmnfN.p08DoVGa
o1qiCtlUYYqyjZ8HCAaMK+dH.njtIlyiDxPoIr4noAiSFzKoAI76ZVZxcHzj
yKSgTsEm53Enxxs5snpsA.8cJaYhILbMqSTtCwIT2SzWcJUNwuCtNBJactl6
F.wFd8ow38BmsvSI4Q205b8XNXDX1mK.ND23cLqe7CI9Uri4iy+RSSUgG5p+
HIpz3nQKZUBfJEBksNW2AcFp8b7I6NnNwkbbb10xHTqsY8b.OBxBZWnopDbs
BOIm+BGfGCsIpqTxkZqhBPSshVmK0RGCp0OPE7taMpU15boVxUnkJ7PVQRyZ
PmNnvjLbn5zqPZZHV6nFdYVFhSeT5UHMYV8Nr2HrbTNZCrNXoAV8xrHZctyg
MDIM7IxUE6mpR5SM8u1pqn0kvKf9roQ8N0YETQVpJnPOhptBazRteTK1KOcT
a+8meDTjfQXFCepaMuunggpQRiV5jcsxuB+C9dg27m27+.7QBpFG
-----------end_max5_patcher-----------
*/
Processing Code
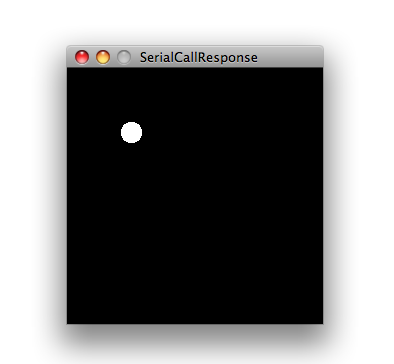
Copy the Processing sketch from the code sample above. As you change the value of the analog sensor, you'll get a ball moving onscreen something like this. When you turn the switch off, the ball will disappear:
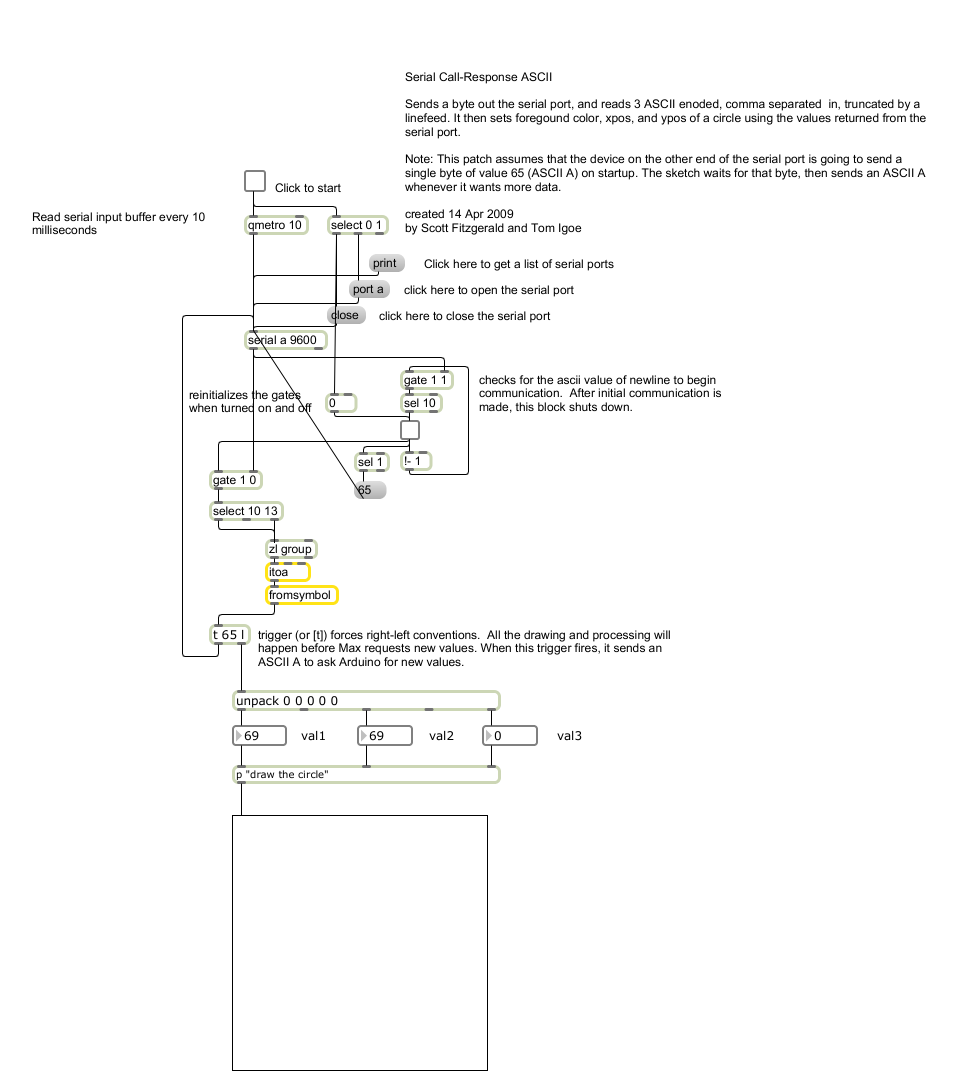
Max Code
The max patch looks like this. Copy the text from the code sample above and paste it into a new Max window
See Also:
serial.begin()serial.available()serial.print()analogRead()map()- Dimmer - move the mouse to change the brightness of an LED.
- Graph - send data to the computer and graph it in Processing
- Physical Pixel - turn an LED on and off by sending data from Processing.
- Virtual Color Mixer - send multiple variables from an Arduino to the computer and read them in Processing.
- Serial Call Response - send multiple variables using a call and response (handshaking) method.
- Serial Input (Switch (case) Statement) - How to take different actions based on characters received by the serial port.