Learning Examples | Foundations | Hacking | Links
Examples > Control Structures
Switch (case) Statement, used with serial input
An if statement allows you to choose between two discrete options, TRUE or FALSE. When there are more than two options, you can use multiple if statements, or you can use the switch statement. Switch allows you to choose between several discrete options.
This tutorial shows you how to use switch to turn on one of several different LEDs based on a byte of data received serially. The sketch listens for serial input, and turns on a different LED for the characters a, b, c, d, or e.
Hardware Required
- Arduino Board
- (5) LEDs
- (5) 220 ohm resistors
- breadboard
- hook-up wire
Circuit
Five LEDs are attached to digital pins 2, 3, 4, 5, and 6 in series through 220 ohm resistors.
To make this sketch work, your Arduino must be connected to your computer. Open the Serial Monitor, and send the characters a, b, c, d, or e, or anything else.
click the image to enlarge
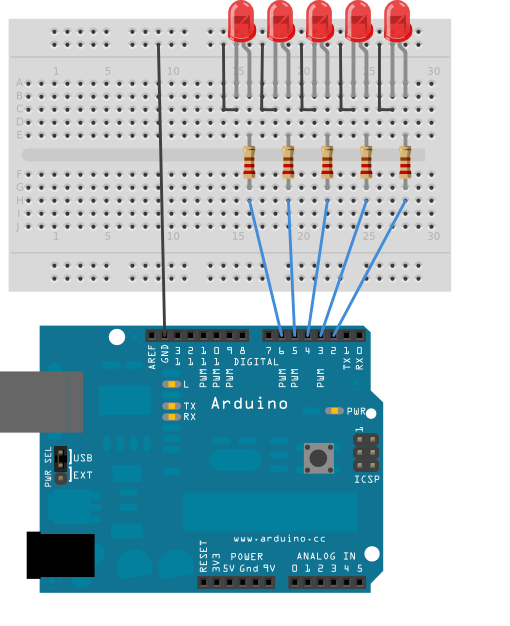
image developed using Fritzing. For more circuit examples, see the Fritzing project page
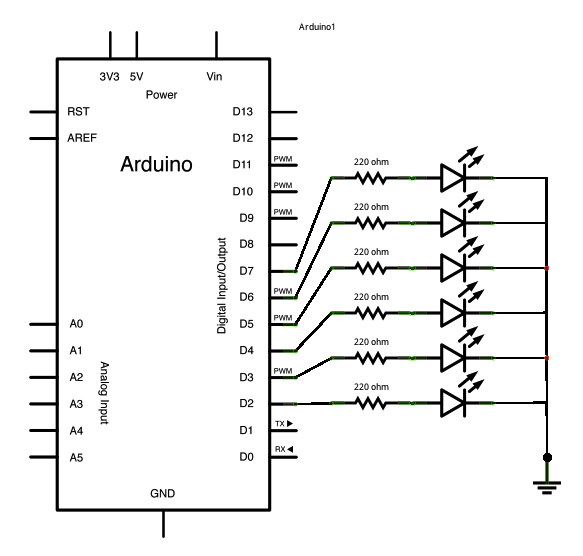
Schematic:
click the image to enlarge
Code
Switch statement with serial input
Demonstrates the use of a switch statement. The switch
statement allows you to choose from among a set of discrete values
of a variable. It's like a series of if statements.
To see this sketch in action, open the Serial monitor and send any character.
The characters a, b, c, d, and e, will turn on LEDs. Any other character will turn
the LEDs off.
The circuit:
* 5 LEDs attached to digital pins 2 through 6 through 220-ohm resistors
created 1 Jul 2009
by Tom Igoe
This example code is in the public domain.
http://arduino.cc/en/Tutorial/SwitchCase2
*/
void setup() {
// initialize serial communication:
Serial.begin(9600);
// initialize the LED pins:
for (int thisPin = 2; thisPin < 7; thisPin++) {
pinMode(thisPin, OUTPUT);
}
}
void loop() {
// read the sensor:
if (Serial.available() > 0) {
int inByte = Serial.read();
// do something different depending on the character received.
// The switch statement expects single number values for each case;
// in this exmaple, though, you're using single quotes to tell
// the controller to get the ASCII value for the character. For
// example 'a' = 97, 'b' = 98, and so forth:
switch (inByte) {
case 'a':
digitalWrite(2, HIGH);
break;
case 'b':
digitalWrite(3, HIGH);
break;
case 'c':
digitalWrite(4, HIGH);
break;
case 'd':
digitalWrite(5, HIGH);
break;
case 'e':
digitalWrite(6, HIGH);
break;
default:
// turn all the LEDs off:
for (int thisPin = 2; thisPin < 7; thisPin++) {
digitalWrite(thisPin, LOW);
}
}
}
}
See Also:
serial.begin()serial.read()serial.available()switch() caseif()digitalWrite()- Serial Call Response - send multiple variables using a call and response (handshaking) method.
- Serial Call and Response ASCII - send multiple vairables using a call-and-response (handshaking) method, and ASCII-encoding the values before sending.
- If Statement - how to use an if statement to change output conditions based on changing input conditions.
- For Loop: - controlling multiple LEDs with a for loop.
- Array: a variation on the For Loop example that demonstrates how to use an array.
- While Loop: how to use a while loop to calibrate a sensor while a button is being read.
- Switch Case: how to choose between a discrete number of values. Equivalent to multiple If statements. This example shows how to divide a sensor's range into a set of four bands and to take four different actions depending on which band the result is in.