Learning Examples | Foundations | Hacking | Links
Examples > Control Structures
Switch (case) Statement, used with sensor input
An if statement allows you to choose between two discrete options, TRUE or FALSE. When there are more than two options, you can use multiple if statements, or you can use the switch statement. Switch allows you to choose between several discrete options. This tutorial shows you how to use it to switch between four desired states of a photo resistor: really dark, dim, medium, and bright.
This program first reads the photoresistor. Then it uses the map() function to map its output to one of four values: 0, 1, 2, or 3. Finally, it uses the switch() statement to print one of four messages back to the computer depending on which of the four values is returned.
Hardware Required
- Arduino Board
- (1) photocell, or analog sensor
- (1) 10k ohm resistors
- breadboard
- hook-up wire
Circuit
The photoresistor is connected to analog in pin 0 using a voltage divider circuit. A 10Kilohm resistor makes up the other side of the voltage divider, running from analog in 0 to ground. The analogRead() function returns a range of about 0 to 600 from this circuit in a reasonably lit indoor space.
click the image to enlarge
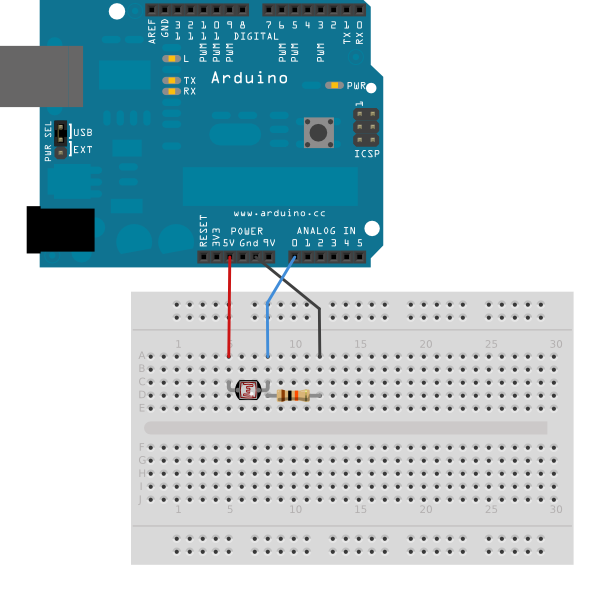
image developed using Fritzing. For more circuit examples, see the Fritzing project page
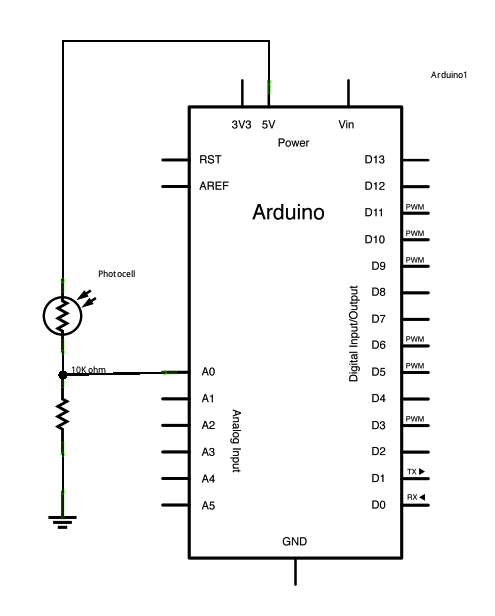
Schematic:
click the image to enlarge
Code
Switch statement
Demonstrates the use of a switch statement. The switch
statement allows you to choose from among a set of discrete values
of a variable. It's like a series of if statements.
To see this sketch in action, but the board and sensor in a well-lit
room, open the serial monitor, and and move your hand gradually
down over the sensor.
The circuit:
* photoresistor from analog in 0 to +5V
* 10K resistor from analog in 0 to ground
created 1 Jul 2009
modified 30 Aug 2011
by Tom Igoe
This example code is in the public domain.
http://arduino.cc/en/Tutorial/SwitchCase
*/
// these constants won't change:
const int sensorMin = 0; // sensor minimum, discovered through experiment
const int sensorMax = 600; // sensor maximum, discovered through experiment
void setup() {
// initialize serial communication:
Serial.begin(9600);
}
void loop() {
// read the sensor:
int sensorReading = analogRead(A0);
// map the sensor range to a range of four options:
int range = map(sensorReading, sensorMin, sensorMax, 0, 3);
// do something different depending on the
// range value:
switch (range) {
case 0: // your hand is on the sensor
Serial.println("dark");
break;
case 1: // your hand is close to the sensor
Serial.println("dim");
break;
case 2: // your hand is a few inches from the sensor
Serial.println("medium");
break;
case 3: // your hand is nowhere near the sensor
Serial.println("bright");
break;
}
}
See Also:
serial.begin()analogRead{}map()Serial.println()- If Statement - how to use an if statement to change output conditions based on changing input conditions.
- For Loop: - controlling multiple LEDs with a for loop.
- Array: a variation on the For Loop example that demonstrates how to use an array.
- While Loop: how to use a while loop to calibrate a sensor while a button is being read.
- Switch Case: how to choose between a discrete number of values. Equivalent to multiple If statements. This example shows how to divide a sensor's range into a set of four bands and to take four different actions depending on which band the result is in.