Learning Examples | Foundations | Hacking | Links
Examples > Ethernet Library
DHCP Chat Server
This example connects to a Telnet server using an Ethernet shield. Messages from the server are printed out via the serial port. Messages can be sent to the remote server serially as well. The Serial monitor works well for this purpose.
This version attempts to get an IP address using DHCP. An IP address can be assigned via DHCP when Ethernet.begin(mac) is called. Be careful, when using the DHCP extensions, sketch size increases significantly.
Hardware Required
- Arduino Ethernet Shield
- Shield-compatible Arduino board
Software Required
- A telnet server
- Alternatively, Processing has a ChatServer example that works well for this purpose
Circuit
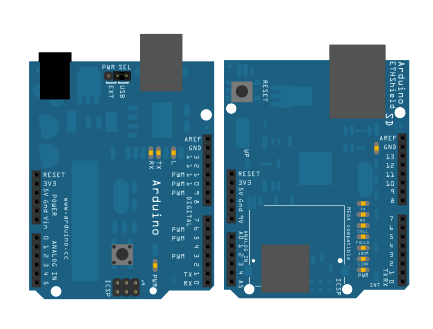
The Ethernet shield allows you to connect a WizNet Ethernet controller to the Arduino via the SPI bus. It uses pins 10, 11, 12, and 13 for the SPI connection to the WizNet. Later models of the Ethernet shield also have an SD Card on board. Digital pin 4 is used to control the slave select pin on the SD card.
The shield should be connected to a network with an ethernet cable. You will need to change the network settings in the program to correspond to your network.
image developed using Fritzing. For more circuit examples, see the Fritzing project page
In the above image, your Arduino would be stacked below the Ethernet shield.
Code
DHCP Chat Server
A simple server that distributes any incoming messages to all
connected clients. To use telnet to your device's IP address and type.
You can see the client's input in the serial monitor as well.
Using an Arduino Wiznet Ethernet shield.
THis version attempts to get an IP address using DHCP
Circuit:
* Ethernet shield attached to pins 10, 11, 12, 13
created 21 May 2011
by Tom Igoe
Based on ChatServer example by David A. Mellis
*/
#include <SPI.h>
#include <Ethernet.h>
// Enter a MAC address and IP address for your controller below.
// The IP address will be dependent on your local network.
// gateway and subnet are optional:
byte mac[] = {
0x00, 0xAA, 0xBB, 0xCC, 0xDE, 0x02 };
IPAddress ip(192,168,1, 177);
IPAddress gateway(192,168,1, 1);
IPAddress subnet(255, 255, 0, 0);
// telnet defaults to port 23
EthernetServer server(23);
boolean gotAMessage = false; // whether or not you got a message from the client yet
void setup() {
// open the serial port
Serial.begin(9600);
// start the Ethernet connection:
Serial.println("Trying to get an IP address using DHCP");
if (Ethernet.begin(mac) == 0) {
Serial.println("Failed to configure Ethernet using DHCP");
// initialize the ethernet device not using DHCP:
Ethernet.begin(mac, ip, gateway, subnet);
}
// print your local IP address:
Serial.print("My IP address: ");
ip = Ethernet.localIP();
for (byte thisByte = 0; thisByte < 4; thisByte++) {
// print the value of each byte of the IP address:
Serial.print(ip[thisByte], DEC);
Serial.print(".");
}
Serial.println();
// start listening for clients
server.begin();
}
void loop() {
// wait for a new client:
EthernetClient client = server.available();
// when the client sends the first byte, say hello:
if (client) {
if (!gotAMessage) {
Serial.println("We have a new client");
client.println("Hello, client!");
gotAMessage = true;
}
// read the bytes incoming from the client:
char thisChar = client.read();
// echo the bytes back to the client:
server.write(thisChar);
// echo the bytes to the server as well:
Serial.print(thisChar);
}
}
See Also:
